Sunday, November 17, 2013

Nothing but us wall flowers...

Living in a rented apartment often means that there are stiff rules that don't always make it easy for you to make your home feel like home. No, I'm not talking about candle and pets being forbidden today I refer to the rule that has been a thorn in my side, a decoration disaster, and a dark cloud over my utilitarian nature. I am talking about not being able to make holes of any size in my walls.
Just to be clear I do not want to knock down a wall or install a small window in my kitchen, I simply want to decorate, and hang picture frames without having to keep Spackle on hand. I don't wish to take revenge on my apartment managers only beat them at this apartment decorating gain. If any of you have been privy to this heinous contractual stipulation then join me in showing our landlords that they are not the masters of our domains, but we are.
Today we will construct the cute, sweet decoration known as: The Wallflower.


To start this project you will need the following:
7-10 toilet paper rolls
some paint: spray or acrylic (either work great)
scissors
pencil
ruler
hot glue gun
and your best fiendishly clever smile. >: D

1. Fold you rolls in half so they lay flat. Measure and mark your rolls in half inch increments, and then cut along the half inch marks.
It might be cute to not fold one in half so you can have a circular center piece in yellow (or another color).

2. Paint on all surfaces except the surfaces that will face the wall.

3. After they have dried it is time to assemble.


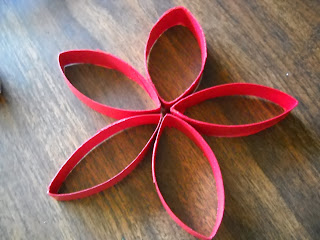
For the first step in assembly you will need to atach five together in a flower shape with hot glue or two sided tape.


Next insert more petals in the inner spaces of the first round of petals. (As seen below)


After your first two rounds of petals add two petals on either side of every petal in the first round, and one just above it. Here you can see what that looks like when it's done to one of the original petals...


and two (Makes it look like a butter fly)...


and all!


Next you simply need to insert petals in every crevice till it is circular in shape. At first it is only a mater of inserting two above the second round of petals, then a pattern of inserting two petals and one petal all the way around. 


Here is what it looks like completely finished. 


To attach to a wall there are a few methods you can use. On the back of mine I squeezed out some hot glue at several points on the back. AFTER WAITING FOR THE GLUE TO COOL (and the paint to dry)...  place it on the wall. If you don't wait long enough you will damage the wall and get some of the paint on it. You want to wait till the glue is cool yet malleable. Another method to employ would be to use double sided tape, sticky tack, or adhesive strips. 

P.S. It is also super cute if you can use the scraps to make a few small flowers to liven up the room too. 


After making this you can say with your fiendish smile "Ha! Take that fee happy landlord! I got around your rule, and I did it with style. :P" (But not to their face, of course. That would be very rude)


Friday, August 2, 2013

Beef, Bean, and Cheese Enchiladas

Our apartment may be small, but our dreams and appetites are anything but. In our home there is always good food with more flavor then you can shake a stick at. And so bean, beef and cheese enchiladas are the order of the night.


But first to make things easy I do some cooking ahead of time. Whenever we purchase ground beef we go ahead and brown it, portion it, and store it in the freezer. This makes quick weeknight meals even easier. To do this simply go ahead and brown with onions, garlic, salt, whatever flavor combination you want. This take some time but the flavor is much better then meat that is frozen and then thawed and browned. To portion the beef simply measure out 2 cups and place in a plastic freezer bag. They've kept in the freezer for about a month for me. Remember to always reheat thoroughly before consuming or serving to other.


The beans are also prepared ahead of time. Start with one pound of dried beans (kidney, pinto, black, what ever you like) 2-1 1/2 cups. After rinsing the beans place them in an oven-safe pot with twice the amount of water and cover with lid. Place the pot in a 400 degrees F oven for 2 hours. After one hour you may want to add 1 1/2 tsp salt and half of a diced onion, depending on your aims and means. That is also a good time to add more water if needed. It is important to not let them go dry and burn. Trust me the smell of burned beans is awful. After 2 hours drain or boil off any liquid that remains. *Hint: Black beans may take slighlt longer.* This also freezes well, in a gallon sized bag laid flat.


Now that the beef and beans are taken care of. It's time for the sauce. You could always open a can of your favorite red enchilada sauce (especially if time is not on your side), but here is a recipe from Allrecipes.com by Brandy T. that I think you might like.

You will need:
1/4 cup vegetable oil
2 Tbs flour (or corn starch)
1/4 cup chili powder
1-8oz can tomato sauce
1 1/2 cups water
1/4 tsp cumin
1/4 tsp garlic powder
1/4 tsp onion power
~1 tsp salt

Start by heating the oil in a skillet over medium-high heat. Stir in flour and chili powder and let brown over medium heat. Stir constantly to prevent burning. Gently stir in the tomato sauce, water and the rest of the seasonings. Cook over medium heat for roughly ten minuets or the desired thickness is achieved. You can watch a video of how it is made here.

Now the fun part can commence: building the enchiladas! I used flour tortillas because I had those on hand but this recipe can be used with corn tortillas. For the filling use half of your enchilada sauce (or half of a 26oz can of sauce) with roughly one pound of each browned hamburger and cooked beans. From the above mentioned techniques that's about one baggie beef and half of all your beans. Mix together and place in the center of each tortilla. Add a generous sprinkling of cheese to the inside of each enchilada. Roll up and place seam side down in a greased baking pan. I use an 8x12in baking pan with much success.

After filling your pan distribute the remaining sauce and whatever filling is left on the top. Cover with 1-2 cups cheeses (as desires) and bake for 30 min in a 350 degree oven.


And there you have it! A delicious home cooked meal and some tips on how to make it easier for you.


Bon Apatite!

Monday, May 27, 2013

So good you just might die.... Peanut butter pie.

If I haven't mentioned it before I love to bake. I love to bake just about anything! But every once in a while it is too hot to turn on the oven, or even think about using the stove. (Not to mention the day's I can't seem to find it.) When those days come around I am glad that I have this gem of a dessert ready and waiting in my arsenal of scrumptious recipes. I have adapted it from one I saw on the Food Network a number of years ago, on a show called Sarah's Secrets. I can no longer find the recipe on the website, but that hardly seems to matter as I committed it to memory almost as soon as seeing it.


This wonderful confection is a cool, sweet, inviting way to enjoy a hot summer day. The first time I made this for my family at Home it was an instant hit. You know that when your siblings start fitting over the last piece. Now I have to make it at every holiday (even the one's in the middle of winter) or I hear about it.


This dreamy treat is filling, yet leaves you craving for more, so make responsibly.

What you'll need:
1 Graham cracker crust (OR 4 Tbs Butter, and 1 1/2 Cups graham crackers crumbled up, mix then press into a pie or spring-form pan)
1/2 Cup Milk (or cream)
1/3 Cup Sugar
1 Cup Peanut Butter
1 tsp Vanilla
1 8oz. container of Whipped Cream

Start by combining the sugar and peanut butter. When that is combined add your vanilla and milk (or cream).

It will look weird but keep stirring and it will come together nicely. 

(Like this)

Now stick it in the chill chest for half an hour.

If you don't have a graham cracker crust (like me) now would would be a good time to make one. 

Graham Cracker Crust:

4 Tbs Butter
6 Graham Crackers (or 1 1/2 cups crackers already crumbled)
One pie pan

Melt butter, set aside. Crush graham crackers. This part can be very fun, but messy. To lessen the mess I use a bag to crumble the graham crackers in.


Rolling pins work great for this.


Mix the two ingredients thoroughly and place in a pie pan. Pat down with a metal spoon or rubber spatula to the shape you want. Set aside.


Once the peanut butter mixture is cooled it is time to fold in you whipped cream. I find it's easy (especially if it's your first time) if the whipped cream is partly frozen. I do this by having it in the freezer before I start then placing it on the counter top when I put the peanut butter mixture in the freezer. If it's still very frozen 10-15 seconds in the microwave will loosen it nicely. Mix but not so much that the whipped cream looses all of it's fluff.

Keep stirring...

Done!
Now you are ready to place the mixture in the graham crust. 


Construction is complete, garnishing may commence. You can be as decorative as you want with this part. You could dust it with coco powder, drizzle chocolate, or pipe whipped cream on, The sky's the limit. For this time around I chose chocolate chips.
Freeze until firm (about one to two hours), and there you go a complete dessert with the only appliance being used is the freezer.


Keep in the freezer until ready to serve. For easy cutting let it sit on your counter top for 5 minuets.


I hope you enjoy this and share it with all your friends.

Sunday, April 7, 2013

Welcome!

Hello and welcome to 300 Square Feet. Here I will share with you the wonderful things that I have been privy to find, make, learn, and experience since being married.  You may be wondering 'Why suck a numerical name for a blog?' Well, wonder no more. About a year ago my husband and I moved in to our 300 square foot apartment (hence the name of the blog). Life within in such a small space is not always easy (we constantly step each others toes and trip over each others misplaced items), but it is anything but boring. While being newly wedded we have had ups and down. We've laughed together and we've cried together, and we have always viewed our trials and adventures as experiences of learning and growing .

Life on the small scale is quite eventful. We have started an amazing journey together and it only promises to get better from here. So come and join us for the ride. Lets make some memories along the way.